Interested in learning to cross stitch? Did you see one of our delightful patterns and feel compelled to create some sweet art? That’s great! Cross-stitch has been around for quite a long time, but only recently has it become popular to combine the traditional craft with non-traditional subject matter, like pop culture references or video game characters. The juxtaposition of seeing unusual sentiments or images immortalized in cross-stitch can be a lot of fun and it can appeal to many different kinds of people: people who are geeks about specific pop culture, or people who just love to craft! Even if you’ve never crafted before, cross-stitch is pretty straight forward and a little like paint by number or coloring in a coloring book. I’ve put together some helpful cross stitch tips and how to’s to get you going.
To get started, you’re going to need a few things:
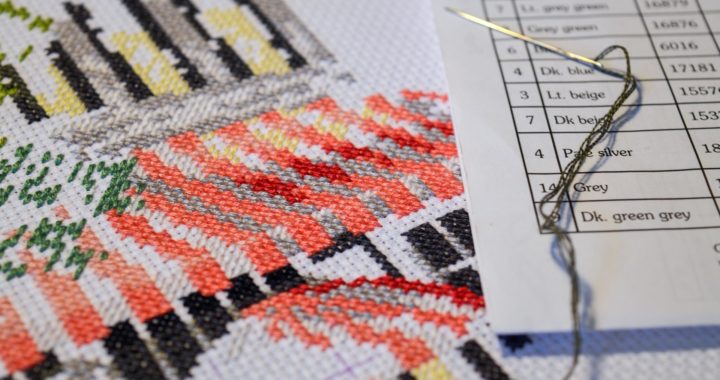
- Cross-stitch fabric – 14-count is standard, but you can make the finished piece larger or smaller if you use a different count. The higher the count, the more little squares fit into an inch of fabric and the smaller your design.
- Embroidery floss – On all Handmade Geek patterns, there is an included chart for the official DNC colors, but if you want to change some of the colors, go nuts!
- A size 24 tapestry needle – Available anywhere embroidery materials are sold.
- Embroidery hoop (Optional) – You can use an embroidery hoop to hold the fabric taut while you work if it helps you, but it is not necessary. I actually just hold the fabric in my hands. Fresh cross-stitch fabric has a bit of stiffness to it that is more than enough stability for me to work. It also allows me to fold my work up (carefully!) and carry it in a plastic pencil box! So portable! Either way, the most important part is that the stitches are even and don’t get too tight and bunch the fabric up. If you decide to use the hoop, it can be plastic, wood, or whatever you like, but it’s important that the hoop clamps the material all the way around. For most of the patterns on The Handmade Geek, a 5” or 6” should be sufficient.
- Scissors – For cutting embroidery floss and cutting the fabric when your design is finished. The sharper the better!
IMPORTANT TIP! Separate the embroidery floss strands.
When you look closely, the embroidery floss is actually like a tiny rope with six little strings in it. I like to cut the embroidery floss first, then carefully separate two of the strings out to use at a time. I once tried to use a full six strings because of laziness… trust me. It does NOT work.
Orienting your design:
Find the approximate center of the pattern, then, find the approximate center of the fabric. Start stitching something that’s close to the center of the pattern. Starting in the middle will ensure that you have enough fabric on all sides to complete your design. Running out of room is no fun.
Stitching Types:
I make it a practice to only use the basic “X” stitch in designs on The Handmade Geek. It makes it look more like computer pixels to me. Patterns from other places may have straight lines in the design or even what amounts to filling up half of a square by stitching through the middle. These are great, but unless noted specifically, our patterns are just a bunch of “X”s.
Begin your project:
Choose or cut a length of thread, 15”-18” is about right. There are a couple of ways to anchor the thread while you work. You can either leave a short tail on the back of the project (1” or so) and make sure your first several stitches cover it to hold it in place, or tie a small knot in one end to keep it from going through the fabric. Sometimes, if there are already lots of stitches in the vicinity of where I want to stitch, I will run the thread underneath the existing stitches. If you’re not sure, try both ways and see which one you like.
In general, I like stitching over the tail because it’s a little neater on the back of the fabric and if you want to frame your work, the finished product lays flatter. Fair warning: you will lose your grip on the tail and have to re-stitch those first couple more than once. It’s okay. It happens to the best of us. (If you would like to see stitching in action, there are many great YouTube tutorials and The Handmade Geek will be creating our own tutorials soon!)
Stitching Tips:
There are two basic methods to create your “X”s. The first is to stitch a complete row of half stitches (/ / / /), then come back (\ \ \ \) to create the “X”s. This is what you’ll use for the majority of your stitching. The other method is to stitch each individual X as you go. This method is good for vertical rows.
Conventional cross-stitch priority is that all of the “X”s cross the same direction. So, when you look at the “X”s, the top thread slants the same way (either \ or /). I have read that if you mix your stitches and the top thread is not consistent, the piece looks uneven. Perhaps I am not patient or detail oriented enough for that, but I often cross all kinds of ways and I think the pieces end up looking fine.
I guess, in general, I usually keep them slanting the same direction if they’re on the same row, but, meh. Once you hit them with an iron, the whole piece is so smushed you can’t tell the direction of the slant unless you’re looking for problems. If crossing the same way is important to you, then you do you. But, in my book, as long as the stitches are the same size and tension, which thread was on top didn’t bother me. Have fun! Be free!
Finishing:
After all your piece has been through, a quick hand wash in some cold water with Woolite or very diluted detergent can be nice. Lay it out or hang it to dry fully, and press with an iron with lots of steam. Be careful not to scorch! If it does scorch, don’t freak out. You can usually get it out if you gently wash it again, assuming it’s only slightly toasted and the fabric isn’t damaged.
When I’m finished, I center the design in the frame, cut the fabric to size, and just mount it under glass. There are ways to mount it to foam board or to pillows, but I am always so excited to see my finished work in presentation, framing is my go to. You can get all kinds of cheap frames at Goodwill or other thrift type stores and sometimes the design of frame will help you choose the project! How fun and creative! If you’d like to sew your design to a pillow, or mount it in any other way, there are YouTube tutorials for those, too.
Happy stitching!!
(I include these directions with every pattern we sell so that you can easily reference them while you’re working.)